Introduction

Blogging is hugely
popular throughout the world today.
It is a
tremendously easy way
for people to share their thoughts, feelings, pictures and many other
things with people from all over the world.
Some people do it to earn money but in
our business it’s easy to forget that most people see blogging as something they enjoy doing and will happily post dozens of posts about
everyday things
including what they are doing each day.
Surprisingly, some of
the most popular blogs online are
people doing just that. Just making small posts
about personal events but doing it in
such a way that people log in every day to read them.
This viral effect can happen almost
instantly and will bring in
hundreds, possibly thousands of people to your blog to see what all the fuss is about.
Many people use blogger.com
as their choice of blogging platform. This is done mainly because it is free and can be done
in a few seconds. This is OK to a certain extent but the problem is that you are
putting all your hard work into someone else’s
hands. Blogger can shut your blog down in an
instant, without even giving a
reason.
This means all your hard work is gone for good and we don’t want
that now do we! So the choice for a more
permanent solution, which puts everything
in your own hands, is to use Wordpress.
5
Wordpress do offer a
free hosted service but if you’re looking at a long term
blog it’s probably better to host the
blog on your own server. They also
offer a free software download that means
you can put your blog on your own
server.
This service is free and can be set up
in just a few minutes. The only thing you require is of course a hosting account..
By using Wordpress, you are also given
instant access to plugins
and tools that aren’t
available in Blogger.com. These tools can make your blog more favourable to the
search engines, as well as more
unique to your visitors. We’ll go
through these plugins later in this
guide.
But one thing to bear in mind is always keeping everything
under your own control and Wordpress is the number 1 way to do this.
With that said, lets
begin with installing Wordpress on
your hosting account.
Installing Wordpress
Wordpress can be installed
on most hosting accounts with just a few clicks of your mouse. If you
haven’t already got a domain and
hosting account, then here’s one that is highly favoured and has all the requirements needed - theexperthost.com. This isn’t an affiliate link and I’m not getting paid for
recommending them,
I just think they work well with Wordpress
and are reliable.
The thing to look
for when choosing
a hosting account, is that it must
come with cPanel and has Fantastico built into it. Most hosting accounts will have this already but
you should always check before making
a decision.
Fantastico allows you to
add many scripts/programs to your website, just by clicking a few buttons. Wordpress, Forums, Message Boards,
Picture Galleries, all can be
installed without you needing any knowledge of them whatsoever.
6
OK, so now lets assume
you have your hosting account and are ready to install Wordpress. First you need to login to your cPanel of your
domain. This is normally http://www.YourDomain.com/cpanel but your host will give you this information. Once logged in, you’ll be presented with the
following screen:

Normally at the bottom of the page, you’ll see an
icon that says
“Fantastico
De Luxe” or just “Fantastico”.
Click this link and you’ll be taken to the page
of scripts that you can install on your website. It looks like this:

As you can see, on the left of the page are all the scripts you can install. Under the “Blogs” section,
you’ll see a link for Wordpress. Click on this link and you’ll see
the following screen:

This will list any current installations of Wordpress that you already have. As
this is probably your first
installation, it should like like the page above with none listed. So to
continue, click the “New Installation” link and you’ll be presented with the following page:

I’ve numbered the boxes so we can
go through them step-by-step. Here we go:
1. This drop down box will
contain a list of domain names or sub-domains that you have on the account. If this is a brand new site,
then you’ll just have the one domain name in the list and will not need to change it.
2. This is where you choose where you want your Wordpress
blog installing. If you’d like it in
the root of your domain (http://www.YourDomain.com) then leave it blank. If on the other hand, you want it installing
in a separate folder (http://www.YourDomain.com/blog) then type in the name of the folder into this box. You do not need to manually create this folder;
the installation will do it for you.
3. This will be
the username you will use to access the
Wordpress Admin section. Choose one you will remember.
4. This is the password for your Wordpress Admin section.
Again, use something
that you will easily remember.
5. The Admin
nickname is what’s used when you are posting to your blog. For instance, when you post and view the blog,
you’ll see that it says “posted by
…” this is what will be
9
displayed. You could
use “Admin”, “Owner”, or simply “Your
Name”.
6. This is the email address that will receive emails when new comments are posted on your blog. This will probably be already filled in for you. You can use another address if you wish.
7. This is the name of the site and on most Wordpress
Themes it will be displayed in the top and bottom sections of your blog. Just choose something appropriate here, you can always change this in the Admin section
at a later date.
8. This is simply a brief description of your blog.
This is sometimes displayed on the sidebar of certain themes.
9. – 10. – 11. –
12. These settings control the “Blog by email” section. Boxes 9. 11.
and 12. will probably be already filled in. You should just have to fill in
the password of your chosen email address. In most cases, these details
aren’t important, as you will be
manually posting to your blogs.
Once
you have filled in these details,
click on “Install Wordpress”
and you’ll see the screen below:

This will just give you a quick rundown of your details. Check they are
correct and then click on “Finish
Installation”.
10
You’ll then see the following screen:

This will again
give you the details of where you
have installed
Wordpress. Take a note of these details for your
records.
Congratulations! You’ve just installed Wordpress!
Although these steps may
seem complicated at first, once you do it once, it will
literally take you about 30 seconds to setup your next one.
11
Changing The Default Settings
Now that you’ve successfully installed Wordpress, its time to
make some important changes. These will really
make the difference in your search
engine positions and also to make sure
you get as many return visitors as possible.
If you stick with the default settings and themes, you’ll be
missing out on a lot of traffic and potentially a lot of money too. So
lets begin:
Logging In
To log into your
Wordpress Admin section, just visit the installation of
your blog and enter the following to the end of the URL:
/wp-admin so if you’ve installed Wordpress
in the root of your domain, then
enter http://www.YourDomain.com/wp-admin
You’ll see the following screen:

Enter your username
and password, which you chose during
setup and it should log you in to your Admin section.
Once logged in, you’ll
see the following screen, which gives you the
main options at the top:

Delete The Default Post And Page
The first step is
to remove the default posts which have been made during the installation. So
click on the “Manage” tab at the top of the screen.
You’ll see there is a post called “Hello World!”
and it
13
has options next to it. Choose “Trash”, then click OK to the popup box. This deletes this
post completely.
Next step is to
remove the default page which has been created. Click on “Pages” at
the top of the screen and delete in the same way.
Add Your Ping List
Your ping list is a list
of services that will be sent a
ping, each time you update your
blog. You can update this list by
clicking on “Options” then “Writing”. The list is at the bottom of that page,
called “Update Services”.
Obviously the more services
you add the better. But, a word of caution, the longer your list,
the more server resources your blog will use. If you are using shared hosting, your hosting company may
remove your blog. So just a small list of the
main services is recommended. Here’s one you can use – you can just copy these into your update service box.
16
Changing The Theme
Your theme is one of the
most important parts of your Wordpress blog. It controls how your blog
looks to your visitors. There
are many free Wordpress themes available, so you shouldn’t find it too
difficult to find one to match your needs.
One thing to bear in mind
here is that the free themes have
almost certainly been used by hundreds
if not thousands of other people. So
to make your theme completely unique,
you should consider having your own theme created for you.
17
Installing A New Theme
This is very easy
to do. Just login to your site via an
FTP program. Then navigate to your Wordpress
installation and you’ll see the following files:
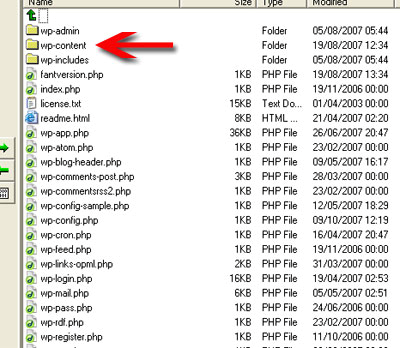
Double click on the “wp-content”
folder and you’ll see the following
files:

Then double click on the
“themes” folder and you’ll see the
following files:

These are the two themes
that come pre-installed in Wordpress. This is where you will upload your new theme. Your theme
should be in a folder, just upload the complete folder to this
directory.
Next, login to your
Wordpress Admin section and choose
the “Presentation” option from
the top section. You should then see
a screen shot of your new theme. Just click on it and it will become your
default theme. Click on the “View Site” link to have a look at it.
Changing the look and feel
of your site with a single click is one
of the most powerful functions of Wordpress.
Blog Promotion
Wordpress blogs promote
themselves very easily. Once you have
added your list of services into the
“Ping List” and setup the Google Sitemaps plugin, each time you post you will automatically
informing these services to come and visit your blog to index your new
content.
But what else can you do?
Well, quite a lot
actually! Web 2.0 is a phrase which you may have heard of. It is basically a
collective term for the newest forms of Web Services, such as social networking, social bookmarking etc. Informing these sites of your
latest posts to your blog is a great way to get almost instant traffic.
A quick way to do this
is to create a free account at Onlywire.com. Onlywire has a list of the most popular social bookmarking sites. You simply sign up to all these
services and they all get saved into your Onlywire account. Then each time you want to submit a new
bookmark, just use the one form at Onlywire and it will automatically bookmark ALL the other services for you. This is a huge timesaver and a great way to
get
spiders quickly to your blog.
Things To Do After Each Post
The first thing to
do after you have posted to your
blog, is submit the page to Onlywire as above. Next you should use the
following services:
Digg allows you
to submit a new story. This is ideal to use for each blog post you make, just create a short summary of
your new post and submit it to
them.
Reddit is similar to
Digg, in that you sign up for free and then submit useful links to your account. If you are lucky enough, your post
can make the front page of Reddit and
should see a few hundred visitors in a day or so.
Stumble is another very
popular bookmarking service. To use
it you will have to install their toolbar. This is done very easily and is free from any spyware or popups.
After each new post to your blog, just click the button on the toolbar and submit the page.
This can bring in a steady trickle of traffic.
Pingoat will submit your new posts to all the popular
RSS feed services. This in addition
with your own ping list, should see a
lot of spider activity on your blog
in a very short space of time.
Just doing these
5 things after each blog
post, will see your blog spidered
very quickly by all of the major search engines and will almost certainly see instant traffic also.
There are of course an
unlimited amount of extra ways to get
free traffic but they go far beyond the scope of this guide. If you find something that works, stick
to it and don’t get distracted by
other methods which may not be as effective.
So there you have it. You now have all the knowledge to become
an instant Wordpress guru. You know exactly what settings must be changed, how
to install a new theme to make your blog unique and how to promote
it to gain instant traffic and to
get into the search engines usually within just a couple of days.
Recent statistics show
that more than 20% of the population have turned into blog readers in
just the last two years. This figure
is rising all the time and there is certainly no sign of it stopping soon. So creating Wordpress blogs right now
is the perfect time to capitalize on this amazing technological advancement.
Give people what they
want in the form of content, news,
videos, will keep them coming back
and becoming loyal visitors to your blogs. The time is now!
So follow the
information in this guide and your
blogs will gain higher rankings, get
more traffic and if used correctly, will make
you more money than anyone else using
Wordpress.
The only thing stopping you IS you!
To Your Blogging
Success.
If you would like me to help setup a website that makes money from
adsense if you contact me using our contact page
Get adsense account approved in 2 days click here
No comments:
Post a Comment